Host Checker Features
•Configuring Host Checker for iOS
•Implementing Host Checker Policies for iOS Devices
Host Checker is a component of Ivanti Secure Access Client that reports the integrity of iOS endpoints that are attempting to connect to Connect Secure. Host Checker runs as a Trusted Network Connect (TNC) client on the endpoint. The client evaluates the endpoint according to predefined criteria and reports to the Trusted Network Connect server, which is a part of Connect Secure. If the endpoint is not in compliance with the Host Checker policies, then the user might not get access to the network or might get limited access to the network depending upon the enforcement policies configured by the administrator.
For iOS clients, Host Checker can evaluate client compliance based on the following predefined criteria:
•OS Checks: You can specify the iOS version or minimal version that must be installed on the device.
•Jail Breaking Detection: Jail breaking is a process that allows Apple iPhone, iPad and iPod Touch users to gain root access to the iOS operating system and bypass usage and access limitations imposed by Apple. With a jail broken device, an iOS user can install applications that are not available through the Apple App Store. Jail broken devices expose the device to a greater risk of running malicious applications.
Configuring Host Checker for iOS
Host Checker policies can be part of a larger Host Checker configuration that applies to many different types of clients or to iOS devices only. However, you might find it easiest to create a separate Host Checker policy specifically for iOS devices.
A Host Checker policy that is configured for a VPN tunnel is not triggered if the VPN is launched automatically by VPN on Demand on iOS.
To create a Host Checker policy for iOS devices:
1.From the admin console, select Authentication > Endpoint Security > Host Checker.
2.In the Policies section, click New to open a New Host Checker Policy page.
3.Specify a name for the new policy and then click Continue to open the Host Checker Policy page.
The name appears in lists when you implement the policy so be sure to use a descriptive name, such as iOS HC Policy.
4.Click the Mobile tab, and then click the iOS tab.
5.In the “Rule Settings” section, click Select Rule Type and select one of the following options and then click Add:
- OS Checks: To specify the iOS version that must be installed on the device:
- Specify a descriptive name for this rule. For example, "Must-Be-iOS-4.1-or-higher". Rule names cannot include spaces.
- Specify the criteria. For example, to enforce iOS 4.1 or higher, create two conditions: "Equal to 4.1" and "Above 4.1".
- Click Save Changes.
- Jail Breaking Detection: Jail breaking is a process that allows Apple iPhone, iPad and iPod Touch users to gain root access to the iOS operating system. and bypass usage and access limitations imposed by Apple. With a jail broken device, an iOS user can install applications that are not available through the Apple App Store. Jail broken devices possess a greater risk of running malicious applications.
- Specify a descriptive name for this rule. For example, "No-iOS-Jailbreak".
- The Don't allow Jail Broken devices check box is enabled by default.
- Click Save Changes.
6.After you have configured all of your rules, specify how you want to enforce them by choosing one of the following options:
•All of the rules
•Any of the rules
•Custom
For Custom requirements, you can specify a custom expression using Boolean operators AND and OR and also group and nest conditions using parenthesis.
7.Specify remediation options:
•Enable custom instructions: If you enable this check box, a text box appears and allows you to type information that appears on the user's device if Host Checker discovers an issue. For example, if you enabled the MSS rule that terminates the VPN session of Host Checker discovers a virus, you can instruct the user to run a virus scan to clear the issue before trying to connect.
•Send reason strings: Select this option to display a message to users (called a reason string) that explains why the client machine does not meet the Host Checker policy requirements. For example, if the jailbreak detection policy fails, it displays "A jailbroken device is not allowed to access the network. Please contact your network administrator."
8.Click Save Changes.
Implementing Host Checker Policies for iOS Devices
After you create one or more Host Checker policies for iOS devices, you must implement them. Connect Secure can use Host Checker policies at the realm or the role level.
Realm Authentication: You can configure a realm authentication policy to download and run Host Checker with a particular Host Checker policy. If the iOS device does not meet the Host Checker requirements, then Connect Secure can deny access. You can provide remediation information in the Host Checker policy to describe the requirement and help users take steps to solve the issue.
To enable a Host Checker policy for a realm:
1.From the admin console, select Users > User Realms > SelectRealm > Authentication Policy > Host Checker. The Host Checker page displays all of the available Host Checker policies.
2.Select the check box next to each policy you want to include. Select one or both of the following check boxes next to the policy:
•Evaluate Policies: Evaluates without enforcing the policy on the iOS device and allows access.
•Require and Enforce: Requires that the iOS device be in compliance with the Host Checker policy. Connect Secure downloads Host Checker to the iOS device after the user is authenticated and before the user is mapped to any roles in the system. Selecting this option automatically enables the Evaluate Policies option.
3.Optionally select Allow access to realm if any ONE of the selected "Require and Enforce" policies is passed. This check box is available if you selected more than one Host Checker policy. If you enable this check box, an iOS device is allowed access if it passes any of the Require and Enforce policies. The Cache Cleaner policy does not apply to iOS devices.
4.Click Save Changes.
Role: You can configure a role to download and run Host Checker with a particular Host Checker policy. If the iOS device does not meet the Host Checker requirements, then Connect Secure can deny access or assign the user to a remediation role that has limited access. You can provide remediation information in the Host Checker policy to help users take steps to solve the issue.
To enable a Host Checker policy for a role:
1.From the admin console, select Users > User Roles > SelectRole > General > Restrictions > Host Checker. The Host Checker page displays all of the available Host Checker policies.
2.Select Allow users whose workstations meet the requirements specified by these Host Checker policies.
3.In the Available Policies list, select the policies that you want to apply to select them, and then click Add to move them to the Selected Policies list. To select a policy click it. To select more than one policy, use CTRL+click.
4.Optionally select Allow access to realm if any ONE of the selected "Require and Enforce" policies is passed. This check box is available if you selected more than one Host Checker policy. If you enable this check box, an iOS device is allowed access if it passes any of the Require and Enforce policies. The Cache Cleaner policy does not apply to iOS devices.
5.Click Save Changes.
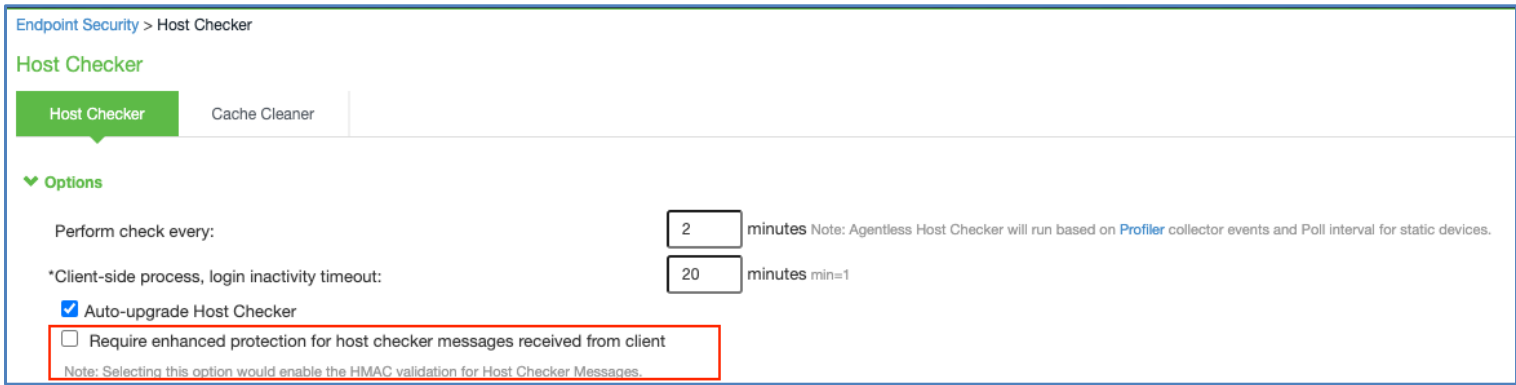
Host Checker Validation
This feature allows the admin to set enhanced protection for the Host Checker messages for ISAC connection from endpoints.
In the ICS Admin Console, select Endpoint Security > Host Checker, enable Require enhanced protection for host checker messages received from client to notify the end user when host checker validation fails.